Author Topic: [AntiDDOS] Install vDDoS on CWP to AntiDDOS, DOS, SYN Flood, HTTP Floods attack  (Read 39971 times)

0 Members and 1 Guest are viewing this topic.

Offline
*
[AntiDDOS] How to Install vDDoS on CWP to AntiDDOS, DOS, SYN Flood, HTTP Floods attack

What is vDDoS?

vDDoS Proxy Protection is free software to provide a Reverse Proxy Server HTTP(S) protocols. It act as a Layer 7 Firewall Filter & Mitigate DOS, DDOS, SYN Floods, or HTTP Floods attack to protect your website.
Homepage: http://vddos.voduy.com

System Requirement:
CentOS Server 5/6/7 x86_64 (http://centos.org)
CloudLinux Server 5/6/7 x86_64 (http://cloudlinux.com)


Install vDDoS Proxy Protection on Centos Web Panel

1. Install vDDoS Proxy Protection: (Please goto vDDoS Homepage and get new version)

Code: [Select]
curl -L https://github.com/duy13/vDDoS-Protection/raw/master/vddos-1.12.0-centos7 -o /usr/bin/vddos
chmod 700 /usr/bin/vddos
/usr/bin/vddos help

/usr/bin/vddos setup

2. Install Centos Web Panel: (Please goto CWP Homepage and get new version)

Code: [Select]
cd /usr/local/src
wget http://centos-webpanel.com/cwp-latest
sh cwp-latest

3. Change Default Port Apache Listen of Centos Web Panel:

CWP Setting > Edit Setting > Apache Port > 8080 (or something like that)


Code: [Select]
[root@vddos ~]# netstat -lntup|grep httpd
tcp        0      0 0.0.0.0:8080                0.0.0.0:*                   LISTEN      7466/httpd

4. Config vDDoS Proxy Protection:

Code: [Select]
nano /vddos/conf.d/website.conf

# Website           Listen            Backend               Cache  Security  SSL-Prikey  SSL-CRTkey
your-domain.com http://0.0.0.0:80 http://167.114.161.2:8080 no     5s             no          no
default         http://0.0.0.0:80 http://167.114.161.2:8080 no     5s             no          no

Security mode: no < 307 < 200 < click < 5s < high < captcha

vDDoS Restart:

Code: [Select]
[root@vddos ~]# vddos restart
0.0.0.0:80
vDDos service Restart success!


4. Example Test website:

Security DDOS mode: 5s checking


Security DDOS mode: reCaptcha checking


View More Config: http://vddos.voduy.com

Part 2: http://forum.centos-webpanel.com/csf-firewall/(antiddos)-vddos-csf-on-cwp-to-antiddos-dos-syn-flood-http-floods-attack/
« Last Edit: April 24, 2017, 06:53:26 AM by duy13 »
Free Support - Problems with Domain, Hosting, VPS, Server... Skype: voduy13

Offline
*
How to update`?
Remove previous installation and install new version?

Offline
*
[ANTIDDOS] for CWP Panel with vDDoS Proxy Protection
« Reply #2 on: June 16, 2018, 04:34:36 PM »
ANTIDDOS CWP Panel (Update 2018 - How to full install)


STEP 1: Install CWP Panel
Code: [Select]
cd /usr/local/src
wget http://centos-webpanel.com/cwp-el7-latest
sh cwp-el7-latest

More documentation: 
http://centos-webpanel.com/cwp-installation

STEP 2: Install vDDoS Proxy Protection
vDDoS Proxy Protection is free software to provide a Reverse Proxy Server HTTP(S) protocols. It act as a Filter & Mitigate DOS, DDOS, SYN Floods, or HTTP Floods attack to protect your website.

Code: [Select]
curl -L https://github.com/duy13/vDDoS-Protection/raw/master/latest.sh -o latest.sh
chmod 700 latest.sh
bash latest.sh

STEP 3: Change Apache Default Port

By default, CWP uses Apache alone and runs on port 80, 443. We can use the function: Setup default Web Servers at Apache Settings >> Select WebServer
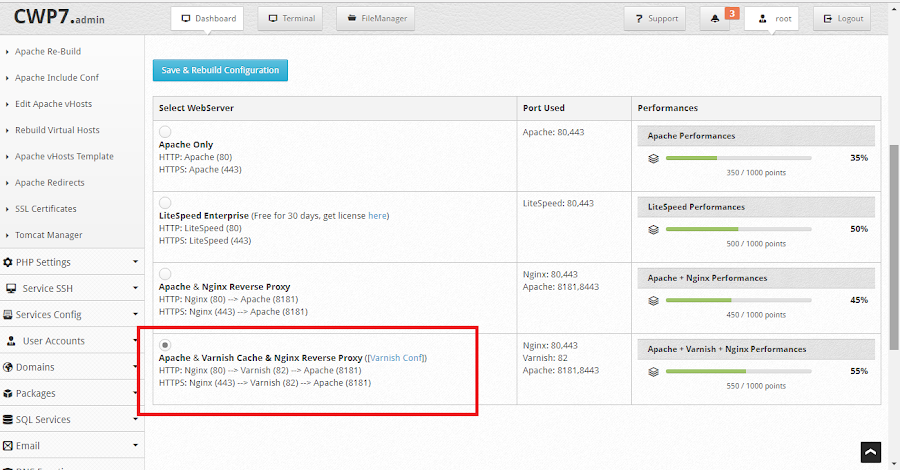


Change it into: Apache & Varnish Cache & Nginx Reverse Proxy or Apache & Nginx Reverse Proxy, So Apache will be listened to at another port is 8181 and 8443; to facilitate our proxying.


Click Save and Re-check Apache port:

Code: [Select]
[root@vDDoS-CWP Panel ~]# netstat -lntup|grep httpd; netstat -lntup|grep nginx; netstat -lntup|grep varnishd
tcp6       0      0 :::8181         :::*                    LISTEN      1304/httpd
tcp6       0      0 :::8443         :::*                    LISTEN      1304/httpd
tcp        0      0 1.2.3.4:80      0.0.0.0:*               LISTEN      5481/nginx: master
tcp        0      0 1.2.3.4:443     0.0.0.0:*               LISTEN      5481/nginx: master
tcp        0      0 127.0.0.1:6082  0.0.0.0:*               LISTEN      1418/varnishd
tcp        0      0 0.0.0.0:82      0.0.0.0:*               LISTEN      1418/varnishd
tcp6       0      0 :::82           :::*                    LISTEN      1418/varnishd

It can be seen that Nginx listened at 80 and 443, then it proxyed to port 82 of Varnish cache server then Varnish continued forwarding traffic to Apache at port 8181.
So you can stop Nginx and replacing it with vDDoS, Reverse Proxy for vDDoS to any port of Apache or Varnish (With Varnish you will be cached and reach faster speeds)

Code: [Select]
service nginx stop
chkconfig nginx off

STEP 4: Config vDDoS Proxy Protection

The following example assumes the IP address of the server you are 1.2.3.4:

Code: [Select]
nano /vddos/conf.d/website.conf

# Website       Listen               Backend                  Cache Security SSL-Prikey   SSL-CRTkey
default         http://0.0.0.0:80    http://1.2.3.4:8181    no    no      no           no
default         https://0.0.0.0:443  http://1.2.3.4:8181   no    no      /vddos/ssl/your-domain.com.pri /vddos/ssl/your-domain.com.crt


Configuration like the above you will use directly from vDDoS reverse proxy to Apache port, If you want to use port of Varnish cache server then you can configure as follows:

Code: [Select]
nano /vddos/conf.d/website.conf

# Website       Listen               Backend                  Cache Security SSL-Prikey   SSL-CRTkey
default         http://0.0.0.0:80    http://1.2.3.4:82    no    no      no           no
default         https://0.0.0.0:443  http://1.2.3.4:82   no    no      /vddos/ssl/your-domain.com.pri /vddos/ssl/your-domain.com.crt

Restart vDDoS service after you have configured:
Code: [Select]
/usr/bin/vddos restart
Auto-start vDDoS services on boot:
Code: [Select]
/usr/bin/vddos autostart


STEP 5: Config vDDoS Auto Add
vDDoS Auto Add is a addon support for vDDoS Proxy Protection - Monitor Domains/Aliasdomains/Subdomains in Panel Hosting, Web Server, List Domain, Virtual Host... and automatically add them into the website.conf file.

Code: [Select]
nano /vddos/auto-add/setting.conf

Default Setting for vddos-add command:

SSL Auto
Cache no
Security no
HTTP_Listen http://0.0.0.0:80
HTTPS_Listen https://0.0.0.0:443
HTTP_Backend http://1.2.3.4:82
HTTPS_Backend http://1.2.3.4:82

Crontab CWP Panel:
Code: [Select]
echo '*/25 * * * * root /usr/bin/vddos-autoadd panel cwp apache' >> /etc/crontab


STEP 6: Config vDDoS Auto Switch
vDDoS Auto Switch is a addon support for vDDoS Proxy Protection - Automatically identifies overloaded websites and changes their Security Mode.

Code: [Select]
echo '*/6 * * * * root /usr/bin/vddos-autoswitch checkalldomain high' >> /etc/crontab
echo '0 */3 * * * root /usr/bin/vddos-autoswitch flushalldomain /vddos/conf.d/website.conf no' >> /etc/crontab
Free Support - Problems with Domain, Hosting, VPS, Server... Skype: voduy13

Offline
*
thanks for your hard work
i am using vddos with success

thank you so much! great tool

Offline
*
Hi guys.

Who can say if the installation can be done now,

Offline
*
Hi guys.
Today I did the installation on my cwp7pro, and the truth was I had nothing to do, apparently the entire installer already does.
The problem I have is that the ssl do not work, and they are very necessary, since all or most of my clients use https.
does nothing in the configuration file, do I have to put all clients one by one ???

Offline
*
Gemisu, how did you achieve the SSL issue? any ideas?

Thanks

Offline
*
Greetings to all.
Could someone update this topic?
After so long I still can't get it to work and I need it.

Offline
****
This isn't a solution if your webserver is constantly DDoS'd.  It's an emergency system for that "One Off" situation.  If your servers is constantly under load from DDoS, you should ditch the domains that are getting hammered.  People who run websites that are constantly under attack should be using high dollar load balanced systems to deal with their issues.
Google Hangouts:  rcschaff82@gmail.com

Offline
*
[AntiDDoS] for CWP Panel with vDDoS Proxy Protection
« Reply #9 on: May 01, 2022, 04:18:15 AM »
ANTIDDOS CWP Panel (Update 2022 - How to full install)

Video: https://www.youtube.com/watch?v=tSoP46Q62oE


STEP 1: Install CWP Panel

Code: [Select]
cd /usr/local/src
wget http://centos-webpanel.com/cwp-el7-latest
sh cwp-el7-latest

More documentation:
https://centos-webpanel.com/cwp-installation


STEP 2: Install vDDoS Proxy Protection

vDDoS Proxy Protection is free software to provide a Reverse Proxy Server HTTP(S) protocols. It act as a Layer 7 Firewall Filter & Mitigate DOS, DDOS, SYN Floods, or HTTP Floods attack to protect your website.

Code: [Select]
wget https://files.voduy.com/vDDoS-Proxy-Protection/latest.sh ; chmod 700 latest.sh ; bash latest.sh

More documentation:
https://vddos.voduy.com


STEP 3: Change Default Port Apache Listen of Centos Web Panel:

By default CWP uses only Apache running on port 80, 443. I will switch to "Nginx Proxy Apache" mode, the purpose is to let Apache change the port and replace Nginx with vDDoS.
We can use the function: Setup default Web Servers at Apache Settings >> Select WebServer


So Apache will be listened to at another port is 8181 and 8443

Code: [Select]
[root@vDDoS-CWP Panel ~]# netstat -lntup|grep httpd
tcp6       0      0 :::8181         :::*                    LISTEN      1304/httpd
tcp6       0      0 :::8443         :::*                    LISTEN      1304/httpd

Stop Nginx:

Code: [Select]
service nginx stop
chkconfig nginx off


STEP 4: Config vDDoS Proxy Protection

For example, the IP Addr of your server is 1.2.3.4:

Code: [Select]
nano /vddos/conf.d/website.conf

# Website       Listen               Backend                  Cache Security SSL-Prikey   SSL-CRTkey
default         http://0.0.0.0:80    http://1.2.3.4:8181    no    no      no           no
default         https://0.0.0.0:443  https://1.2.3.4:8443   no    no      /vddos/ssl/your-domain.com.pri /vddos/ssl/your-domain.com.crt
Restart vDDoS service after you have configured:

Code: [Select]
/usr/bin/vddos restart


STEP 5: Config vDDoS Auto Add

vDDoS Auto Add is a addon support for vDDoS Proxy Protection - Monitor Domains/Aliasdomains/Subdomains in Panel Hosting, Web Server, List Domain, Virtual Host... and automatically add them into the website.conf file.

Code: [Select]
nano /vddos/auto-add/setting.conf

# Default Setting for vddos-add command:

SSL auto
DNS_sleep 66
DNS_alias_mode no
Cache no
Security no
HTTP_Listen http://0.0.0.0:80
HTTPS_Listen https://0.0.0.0:443
HTTP_Backend http://1.2.3.4:8181
HTTPS_Backend https://1.2.3.4:8443

Set Crontab:

Code: [Select]
echo '*/15 * * * * root /usr/bin/vddos-autoadd panel cwp apache' >> /etc/crontab


STEP 6: Config vDDoS Auto Switch

vDDoS Auto Switch is a addon support for vDDoS Proxy Protection - Automatically identifies overloaded websites and changes their Security Mode.

Code: [Select]
nano /vddos/auto-switch/setting.conf

# This is the default configuration for "sensor-switch.sh" and "vddos-autoswitch.sh"

hostname="vDDoS Master" #(Name this server, it will show up in Email notifications)

vddos_master_slave_mode="no" #(Turn on "yes" if your system has slave servers, want to sync affter switch like master)
backend_url_check="no" #(Put the URL of the backend. Ex: https://1.1.1.1:8443/ (make sure Backend status response is "200"))

send_notifications="no" #(Turn on "yes" if you want receive notification)
smtp_server="smtps://smtp.gmail.com" #(SMTP Server)
smtp_username="xxx@gmail.com" #(Your Mail)
smtp_password="xxxxxxxxxxxxx" #(Get your Apps password for Gmail from https://security.google.com/settings/security/apppasswords)
send_notifications_to="xxxx@gmail.com" #(Your Email Address will receive notification)


maximum_allowable_delay_for_backend=2 #(Means: If Backend (status response "200") is slower than 2s, vDDoS will enable challenge mode)
maximum_allowable_delay_for_website=2 #(Means: If Website (status response "200") is slower than 2s, vDDoS will enable challenge mode)

default_switch_mode_not_attack="no" #(Default Mode vDDoS use when it's not under attacked)
default_switch_mode_under_attack="high" #(Default Mode vDDoS use when it's under attack)
default_waiting_time_to_release="60" #(For example 60 minutes, release time from challenge)


Crontab vDDoS Auto Switch:

Code: [Select]
echo '*/5 * * * * root /usr/bin/vddos-autoswitch checkalldomain high' >> /etc/crontab
echo '0 */3 * * * root /usr/bin/vddos-switch allsite no && /usr/bin/vddos reload' >> /etc/crontab
echo '* * * * * root /usr/bin/vddos-sensor' >> /etc/crontab


More documentation:
https://github.com/duy13/vDDoS-Auto-Switch
« Last Edit: May 01, 2022, 04:20:50 AM by duy13 »
Free Support - Problems with Domain, Hosting, VPS, Server... Skype: voduy13