 Show Posts
This section allows you to view all posts made by this member. Note that you can only see posts made in areas you currently have access to.
Pages: [1]
1
E-Mail / Configure autodiscover info for mail clients to setup pop/imap/smtp settings
« on: September 20, 2019, 04:13:33 PM »
Some mail clients will use a system called "Autodiscover" to figure out which settings to use for the pop/imap/smtp settings. You can set this up if you'd like, it basically requires a subdomain and a SRV record. You can add the SRV record into any domain you want to use these settings for.
If you've got a global SSL certificate in Postfix/dovecot for your hostname, this would be a good way to ensure clients use the correct value, so they don't get SSL certificate errors.
Let's assume you're going to have your clients with datahead.biz connect to host.datahead.biz for both IMAP and SMTP. So we have a subdomain called host.datahead.biz to store the XML, where host.datahead.biz is a Server FQDN .
1.Setup a SRV record in the datahead.biz DNS zone:
_autodiscover._tcp.datahead.biz. 3600 IN SRV 10 10 443 host.datahead.biz.
2.Next, Creat a file named autodiscover.php on /usr/local/apache/htdocs/
# vi /usr/local/apache/htdocs/autodiscover.php
Please follow the below link for Details :
How to Configure autodiscover information for mail clients to setup pop/imap/smtp settings automatically on CentOS WebPanel?
2
Postfix / How to Secure CWP Postfix and Dovecot with Lets Encrypt SSL Certificate ?
« on: September 04, 2019, 02:32:16 PM »
Hi
It is very important to secure your Postfix /Dovecot mail server on Centos CWP server .
You can protect your self from Spamming . So if you want to secure your mail then follow below the guide .
I used medium chiper with LestEncrypt SSL .
https://www.awsmonster.com/search/label/Postfix
For strong chiper :
https://access.redhat.com/articles/1468593
https://access.redhat.com/articles/1470523
if you have any question , Let me know .
3
Postfix / Enable logging of Emails Subject Line in Postfix Maillog
« on: August 26, 2019, 09:58:15 AM »
By default Postfix MTA only capture From and To details in the log file (/var/log/maillog). There are some scenarios where we want that emails subject should be capture in the maillog. This will very useful for email administrators when performing troubleshooting of problems related with email. There are simple steps to enable logging of the email subject in postfix maillog.
We are assuming that postfix is already up and running and will make below changes.
Step:1 Edit /etc/postfix/main.cf file & uncomment below line:
#header_checks = regexp:/etc/postfix/header_checks
Step:2 Append the below line in /etc/postfix/header_checks [at the bottom]
/^Subject:/ WARN
Step:3 Run postmap to apply the new configuration in /etc/postfix/header_checks
[root@server1 ~]# postmap /etc/postfix/header_checks
Step:4 Restart or Reload the postfix server
[root@server1 ~]# systemctl restart postfix
[root@server1 ~]# postfix reload
Details Guide :
https://www.awsmonster.com/2019/08/how-to-enable-logging-of-emails-subject.html
4
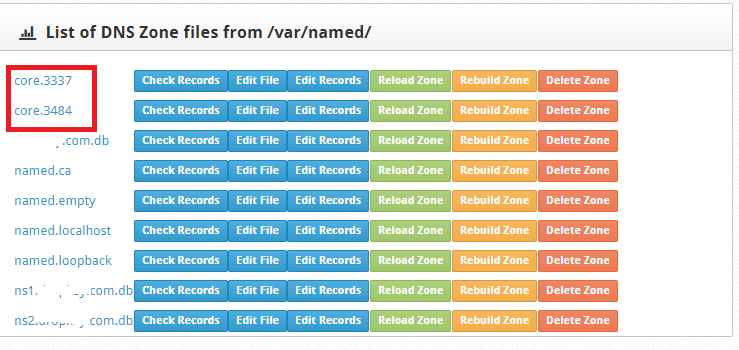
DNS / CWP DNS is Compromise on New Installation
« on: June 26, 2019, 10:15:38 AM »
Hi
I have installed CWP on new VPS and observed that there is file on /var/named/ directory , which is completely new and unknown.
Please check the below snapshoot
Admin,
Would you please explain about that ?
W/R
Glorency
I have installed CWP on new VPS and observed that there is file on /var/named/ directory , which is completely new and unknown.
Please check the below snapshoot
Admin,
Would you please explain about that ?
W/R
Glorency
5
Postfix / Manage your Postfix Mail Server using PostfixAdmin on CWP
« on: April 28, 2019, 10:50:07 AM »
Hi
My client wants only email hosting , So How can i provide email hosting only to my clients on CWP server ?
It's very easy to provide on CWP server. Add the domain to your dns server only (DNS Functions >> Add DNS Zone)
Install the PostfixAdmin on a sub-domain.
Just Follow this Guide
CWP: How to Integrate Postfix Admin 3.1 in CentOS WebPanel on CentOS 7
6
E-Mail / Use Webmin to manage Postfix
« on: April 17, 2019, 04:44:36 PM »
Hi
If you are in trouble to manage your postfix mail server , then install latest webmin on CWP server and use maximum option provided by Webmin for Postfix .
Webmin Installation Guide on CWP Server:
CWP: How to Install Latest Webmin 1.90 on CentOS 7.6
CWP: How to add Let's Encrypt SSL certificate to Webmin
If you need any help, just left a comment, i will try my best .
7
CentOS Configuration / Roundcube Implementation with Calendar, TaskList, Branding....etc for CWP
« on: April 13, 2019, 10:06:26 AM »
CentOS Webpanel - Roundcube Implementation
Details : https://www.awsmonster.com/p/roundcube-configuration_12.html
1.Configure Default Roundcube Plugins after CWP Fresh Installation
2.Configure Roundcube Password Policy
3.How to enable Vacation Option in Rouncube Webmail using managesieve
4.How to install composer.phar or Could not open input file: composer.phar (solved)
5.Customize Roundcube Webclient for Branding!
6.How to Change Roundcube Theme
7.How to Add/Enable Roundcube Plugins
8.How to Install new Theme (Roundcube Plus free skins ) for Roundcube
9.How to upgrade from RoundCube Mail Version 1.2.3 to RoundCube Mail Version 1.3.8
10.How to Install Calendar for Rouncube
11.How to Install tasklist or todolist for Rouncube
12.Protect RoundCube From Brute Force Attack with Google reCaptcha
13.Configure Default Roundcube settings as you want
14.How to check Roundcube All Configuration using Roundcube Webmail Installer
15.Roundcube Login Problem [ Connection to storage server failed ] (Solved)
16.After adding Hostname SSL, Roundcube unable to load the message in a Frame (Solved)
8
CentOS 7 Problems / Must Follow CWP Installation Perquisite
« on: April 13, 2019, 06:28:43 AM »
I have observed carefully and found that some new user(s) doesn't meet CWP Installation Prerequisite. To avoid the installation error, Please follow the CWP Installation Prerequisite
CWP Installation Prerequisite
CWP Installation Perquisite : Disable SeLinux
CWP Installation Perquisite : Disable Firewalld
CWP Installation Perquisite : Set Hostname Permanently
CWP Installation Perquisite : Disable Network Manager & Set Static IP
CWP Installation Perquisite : Install Chrony and Configure NTP server
CWP Installation Perquisite : Set-Up Time Zone
CWP Installation Perquisite : Install Latest EPEL Release
9
PHP / Before Compiling PHP | You should Identify the stable release
« on: April 03, 2019, 04:27:10 AM »
Current and Old Stable PHP
PHP 7.3.3
PHP 7.2.16
PHP 7.1.27
https://www.php.net/downloads.php
no longer supported PHP version
https://www.php.net/releases/index.php
PHP 7.3.3
PHP 7.2.16
PHP 7.1.27
https://www.php.net/downloads.php
no longer supported PHP version
https://www.php.net/releases/index.php
10
How to / How to monitor CWP Server Services using Monit ?
« on: March 09, 2019, 11:38:26 AM »
Monit is a free open source and a very helpful program that automatically monitors and manages server process, files, directories, checksums, permissions, filesystems and services like Apache, Nginx, MySQL, FTP, SSH, Postfix and so on in a UNIX/Linux based systems and provides an excellent monitoring functionality to system administrators.
Follow The Below Guide:
CWP: How to monitor CWP Server Services using Monit on CentOS 7.6
https://blog.awsmonster.com/2019/03/cwp-how-to-monitor-cwp-server-services.html
CWP: How to Add Let's Encrypt SSL to Monit on CentOS 7.6
https://blog.awsmonster.com/2019/03/cwp-how-to-add-lets-encrypt-ssl-to.html
11
SSL / Install Let'sEncrypt for Admin Panel & User Panel Again, 100% Working
« on: January 12, 2019, 07:36:37 PM »
Hello Everybody,
I wrote a blog on http://forum.centos-webpanel.com regarding Let's Encrypt SSL Certificate for CentOS Web Panel when "Letsencrypt Manager" option was exist under Apache Settings >> Letsencrypt Manager >> Install Letsencrypt .
At Present CWP Team has been removed "Letsencrypt Manager" that's why it will not renew any cert automatic . They made Auto SSL by default but Auto SSL grade is B and I'm not satisfied with Auto SSL.
Previous Article Link : http://forum.centos-webpanel.com/ssl/install-letsencrypt-ssl-certificate-for-your-server-hostnamefqdn-100-working/
So Previous Tutorial will not work any more on New version of CWP . And It's very awkward for all when some popular feature has been removed from CWP
N.B: I am using the below cipherlist
https://cipherli.st/
https://mozilla.github.io/server-side-tls/ssl-config-generator/
https://wiki.mozilla.org/Security/Server_Side_TLS
So now I am writing this solution again for all of guys and I hope that it will be 100% working again on your CentOS-Webpanel as mine .
Environment Details:
CPU Model: Intel(R) Xeon(R) CPU X3440 @ 2.53GHz
CPU Details: 2 Core (2527 MHz)
Distro Name: CentOS Linux release 7.6.1810 (Core)
Kernel Version: 3.10.0-957.1.3.el7.x86_64
CentOS-Web Panel version: CWP7.admin
CWP version: 0.9.8.757
RAM: 4 GB
Type: VPS
Install Certbot
Check both are installed or not
To avoid duplicating code create the following two configurations snippets:
Generate SSL using certbot
Backup the original file
Edit the file and paste the code & save it
Check the apache syntax and restart the httpd & reload cwpsrv
Uncomment the module & save
Check the apache syntax again and restart the httpd & reload cwpsrv , If you get any error , Please fix the issue . I didn't get any error
Now Fix The Permission :
User Account >> Fix Permissions
Now Edit the following File and save it as below:
Finally reload the server
Now the Final stage is Here:
For Admin Panel
For User Panel
For Webmail
Now Browse all the link and you will not get any warning
CWP Admin Panel Link (by hostname)
CWP Admin Panel Link: http://host.domain.biz:2030
CWP Admin Panel Link: http://host.domain.biz:2086
CWP Admin Panel SSL Link: https://host.domain.biz:2031
CWP Admin Panel SSL Link: https://host.domain.biz:2087
CWP User Panel Link (by hostname)
CWP User Panel Link: http://host.domain.biz:2082
CWP User Panel SSL Link: https://host.domain.biz:2083

Check your SSL setting:
https://www.ssllabs.com/ssltest/
https://www.sslshopper.com/
Please comment and share , If you have any difficulties
For Any kind of Assistance :
Email: glorency[at]outlook.com
VPS : Dedicated Server: Email Solution
I wrote a blog on http://forum.centos-webpanel.com regarding Let's Encrypt SSL Certificate for CentOS Web Panel when "Letsencrypt Manager" option was exist under Apache Settings >> Letsencrypt Manager >> Install Letsencrypt .
At Present CWP Team has been removed "Letsencrypt Manager" that's why it will not renew any cert automatic . They made Auto SSL by default but Auto SSL grade is B and I'm not satisfied with Auto SSL.
Previous Article Link : http://forum.centos-webpanel.com/ssl/install-letsencrypt-ssl-certificate-for-your-server-hostnamefqdn-100-working/
So Previous Tutorial will not work any more on New version of CWP . And It's very awkward for all when some popular feature has been removed from CWP
N.B: I am using the below cipherlist
https://cipherli.st/
https://mozilla.github.io/server-side-tls/ssl-config-generator/
https://wiki.mozilla.org/Security/Server_Side_TLS
So now I am writing this solution again for all of guys and I hope that it will be 100% working again on your CentOS-Webpanel as mine .
Environment Details:
CPU Model: Intel(R) Xeon(R) CPU X3440 @ 2.53GHz
CPU Details: 2 Core (2527 MHz)
Distro Name: CentOS Linux release 7.6.1810 (Core)
Kernel Version: 3.10.0-957.1.3.el7.x86_64
CentOS-Web Panel version: CWP7.admin
CWP version: 0.9.8.757
RAM: 4 GB
Type: VPS
Code: [Select]
# hostname
host.datahead.biz

# cat /etc/redhat-release
CentOS Linux release 7.6.1810 (Core)

# getenforce
Disabled

# systemctl status firewalld
â firewalld.service
   Loaded: masked (/dev/null; bad)
   Active: inactive (dead)

Before issuing SSL , You must have proper DNS Records
Install Certbot
Code: [Select]
# yum install epel-release (if not installed)
# yum update -y
# yum install certbot
Check both are installed or not
Code: [Select]
# yum info mod_ssl openssl In my case, mod_ssl is not installed , No issue if openssl is installed , then it would be okay.To avoid duplicating code create the following two configurations snippets:
Code: [Select]
# vi /usr/local/apache/conf.d/letsencrypt.conf

Alias /.well-known/acme-challenge/ "/usr/local/apache/autossl_tmp/.well-known/acme-challenge/"
<Directory "/usr/local/apache/autossl_tmp/">
    AllowOverride None
    Options MultiViews Indexes SymLinksIfOwnerMatch IncludesNoExec
    Require method GET POST OPTIONS
</Directory>

:x
Generate SSL using certbot
Code: [Select]
# certbot certonly --agree-tos --email admin@datahead.biz --webroot -w /usr/local/apache/autossl_tmp/ -d host.datahead.biz
Saving debug log to /var/log/letsencrypt/letsencrypt.log
Plugins selected: Authenticator webroot, Installer None
Starting new HTTPS connection (1): acme-v02.api.letsencrypt.org
Obtaining a new certificate
Performing the following challenges:
http-01 challenge for host.datahead.biz
Using the webroot path /usr/local/apache/autossl_tmp for all unmatched domains.
Waiting for verification...
Cleaning up challenges

IMPORTANT NOTES:
 - Congratulations! Your certificate and chain have been saved at:
   /etc/letsencrypt/live/host.datahead.biz/fullchain.pem
   Your key file has been saved at:
   /etc/letsencrypt/live/host.datahead.biz/privkey.pem
   Your cert will expire on 2019-02-02. To obtain a new or tweaked
   version of this certificate in the future, simply run certbot
   again. To non-interactively renew *all* of your certificates, run
   "certbot renew"
 - If you like Certbot, please consider supporting our work by:

   Donating to ISRG / Let's Encrypt:   https://letsencrypt.org/donate
   Donating to EFF:                    https://eff.org/donate-le
Backup the original file
Code: [Select]
# cp /usr/local/apache/conf.d/ssl.conf /usr/local/apache/conf.d/bak.ssl.conf.orig Edit the file and paste the code & save it
Code: [Select]
# vi /usr/local/apache/conf.d/ssl.conf
<IfModule !ssl_module>
LoadModule ssl_module modules/mod_ssl.so
</IfModule>
Listen 443
SSLCipherSuite EECDH+AESGCM:EDH+AESGCM:AES256+EECDH:AES256+EDH
SSLProtocol All -SSLv2 -SSLv3 -TLSv1 -TLSv1.1
SSLHonorCipherOrder On
Header always set Strict-Transport-Security "max-age=63072000; includeSubDomains; preload"
Header always set X-Frame-Options DENY
Header always set X-Content-Type-Options nosniff
# Requires Apache >= 2.4
SSLCompression off

# OCSP Stapling, only in httpd 2.3.3 and later
SSLUseStapling on
SSLStaplingCache "shmcb:logs/stapling-cache(150000)"
# Requires Apache >= 2.4.11
SSLSessionTickets Off


SSLStaplingResponderTimeout 5
SSLStaplingReturnResponderErrors off
SSLStaplingCache        shmcb:/var/run/ocsp(128000)

#NameVirtualHost server_ip:443
Check the apache syntax and restart the httpd & reload cwpsrv
Code: [Select]
# /usr/local/cwpsrv/bin/cwpsrv t
# systemctl restart httpd
# sh /scripts/reload_cwpsrv
Uncomment the module & save
Code: [Select]
# vi /usr/local/apache/conf/httpd.conf
LoadModule ssl_module modules/mod_ssl.so
LoadModule socache_shmcb_module modules/mod_socache_shmcb.so
Check the apache syntax again and restart the httpd & reload cwpsrv , If you get any error , Please fix the issue . I didn't get any error
Code: [Select]
# /usr/local/cwpsrv/bin/cwpsrv t
# systemctl restart httpd
# sh /scripts/reload_cwpsrv Now Fix The Permission :
User Account >> Fix Permissions
Now Edit the following File and save it as below:
Code: [Select]
# vi /usr/local/apache/conf.d/hostname-ssl.conf
# vhost_start host.datahead.biz
<VirtualHost *:443>
        ServerName host.datahead.biz
        ServerAdmin webmaster@datahead.biz
        DocumentRoot /usr/local/apache/htdocs/

        SSLEngine on
        SSLCipherSuite EECDH+AESGCM:EDH+AESGCM:AES256+EECDH:AES256+EDH
        SSLProtocol All -SSLv2 -SSLv3 -TLSv1 -TLSv1.1
        SSLCertificateFile /etc/letsencrypt/live/host.datahead.biz/cert.pem
        SSLCertificateKeyFile /etc/letsencrypt/live/host.datahead.biz/privkey.pem
        SSLCertificateChainFile /etc/letsencrypt/live/host.datahead.biz/fullchain.pem
        SetEnvIf User-Agent ".*MSIE.*" nokeepalive ssl-unclean-shutdown

        <IfModule mod_suexec.c>
                SuexecUserGroup nobody nobody
        </IfModule>

        <IfModule mod_suphp.c>
                suPHP_UserGroup nobody nobody
                suPHP_ConfigPath /home/nobody
        </IfModule>

        <Directory "/usr/local/apache/htdocs/">
        AllowOverride All
        </Directory>

</VirtualHost>
# vhost_end host.datahead.biz
Finally reload the server
Code: [Select]
# /usr/local/cwpsrv/bin/cwpsrv t
# systemctl restart httpd
# sh /scripts/restart_cwpsrv Now the Final stage is Here:
For Admin Panel
Code: [Select]
# vi /usr/local/cwpsrv/conf/cwpsrv.conf

Find the below code :
ssl_certificate     /etc/pki/tls/certs/hostname.crt;
ssl_certificate_key /etc/pki/tls/private/hostname.key;
ssl_protocols       TLSv1 TLSv1.1 TLSv1.2;
ssl_ciphers         HIGH:!aNULL:!MD5;

And replace with:
ssl_certificate     /etc/letsencrypt/live/host.datahead.biz/fullchain.pem;
ssl_certificate_key /etc/letsencrypt/live/host.datahead.biz/privkey.pem;
ssl_protocols       TLSv1.2;
ssl_ciphers         EECDH+AESGCM:EDH+AESGCM:AES256+EECDH:AES256+EDH;

:x
For User Panel
Code: [Select]
# vi /usr/local/cwpsrv/conf.d/users.conf

Find the below code :
ssl_certificate     /etc/pki/tls/certs/hostname.crt;
ssl_certificate_key /etc/pki/tls/private/hostname.key;
ssl_protocols       TLSv1 TLSv1.1 TLSv1.2;
ssl_ciphers         HIGH:!aNULL:!MD5;

And replace with:
ssl_certificate     /etc/letsencrypt/live/host.datahead.biz/fullchain.pem;
ssl_certificate_key /etc/letsencrypt/live/host.datahead.biz/privkey.pem;
ssl_protocols       TLSv1.2;
ssl_ciphers         EECDH+AESGCM:EDH+AESGCM:AES256+EECDH:AES256+EDH;

:x
For Webmail
Code: [Select]
# vi /usr/local/cwpsrv/conf.d/webmail.conf

Find the below code :
ssl_certificate     /etc/pki/tls/certs/hostname.crt;
ssl_certificate_key /etc/pki/tls/private/hostname.key;
ssl_protocols       TLSv1 TLSv1.1 TLSv1.2;
ssl_ciphers         HIGH:!aNULL:!MD5;

And replace with:
ssl_certificate     /etc/letsencrypt/live/host.datahead.biz/fullchain.pem;
ssl_certificate_key /etc/letsencrypt/live/host.datahead.biz/privkey.pem;
ssl_protocols       TLSv1.2;
ssl_ciphers         EECDH+AESGCM:EDH+AESGCM:AES256+EECDH:AES256+EDH;

:x
Now Browse all the link and you will not get any warning
CWP Admin Panel Link (by hostname)
CWP Admin Panel Link: http://host.domain.biz:2030
CWP Admin Panel Link: http://host.domain.biz:2086
CWP Admin Panel SSL Link: https://host.domain.biz:2031
CWP Admin Panel SSL Link: https://host.domain.biz:2087
CWP User Panel Link (by hostname)
CWP User Panel Link: http://host.domain.biz:2082
CWP User Panel SSL Link: https://host.domain.biz:2083
Check your SSL setting:
https://www.ssllabs.com/ssltest/
https://www.sslshopper.com/
Please comment and share , If you have any difficulties
For Any kind of Assistance :
Email: glorency[at]outlook.com
VPS : Dedicated Server: Email Solution
12
PHP / How to Load PHP extensions Imagick & Exif for Rouncube Webmail
« on: December 27, 2018, 10:41:05 AM »
Hi
I have installed successfully both PHP extensions Imagick & Exif but the extension is not showing in Roundcube Webmail Installer .
Please check the images for reference(s) :

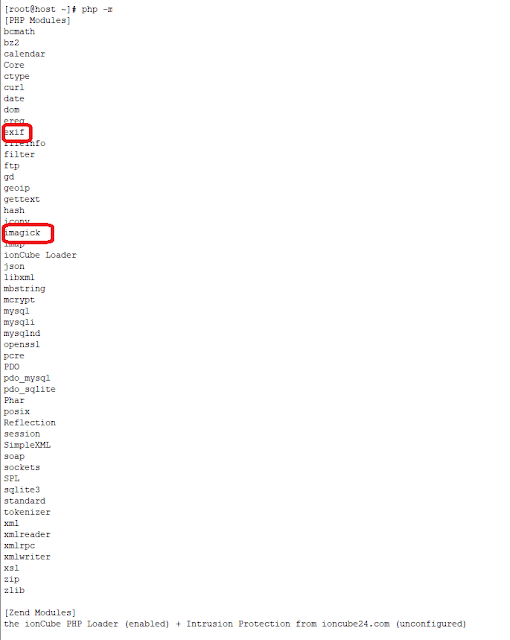
How can i fix this issue ?
Thanks
I have installed successfully both PHP extensions Imagick & Exif but the extension is not showing in Roundcube Webmail Installer .
Please check the images for reference(s) :
How can i fix this issue ?
Thanks
13
SSL / Make Your Server FQDN [Lets Encrypt/Auto SSL] SSL certificate A+ Grade
« on: October 09, 2018, 02:14:33 PM »
Hello Everybody
Hope you are doing well. I am using CWP6.admin in CentOS 6.9 with Lets Encrypt .
But My SSL certificate grade is B and My Cipher list is not so strong.
So I am going use Strong Cipher list and I will show you that how to make your SSL certificate A+ grade .
Visit https://www.ssllabs.com/ssltest/ and Provide your Server FQDN & wait for the result .
You will see that your SSL is not A+ grade .
Login to your server using SSH .
1.Change the directory
#cd /usr/local/apache/conf.d/
2.Backup ssl.conf
3. Edit ssl.conf & paste the below code
#vi ssl.conf
<IfModule !ssl_module>
LoadModule ssl_module modules/mod_ssl.so
</IfModule>
Listen 443
SSLCipherSuite EECDH+AESGCM:EDH+AESGCM:AES256+EECDH:AES256+EDH
SSLProtocol All -SSLv2 -SSLv3 -TLSv1 -TLSv1.1
SSLHonorCipherOrder On
Header always set Strict-Transport-Security "max-age=63072000; includeSubDomains; preload"
Header always set X-Frame-Options DENY
Header always set X-Content-Type-Options nosniff
# Requires Apache >= 2.4
SSLCompression off
# OCSP Stapling, only in httpd 2.3.3 and later
SSLUseStapling on
SSLStaplingCache "shmcb:logs/stapling-cache(150000)"
# Requires Apache >= 2.4.11
SSLSessionTickets Off
SSLStaplingResponderTimeout 5
SSLStaplingReturnResponderErrors off
SSLStaplingCache shmcb:/var/run/ocsp(128000)
#NameVirtualHost server_ip:443
4.save & close
5. Open httpd.conf file
#vi /usr/local/apache/conf/httpd.conf
Enable the below module , just uncomment
LoadModule socache_shmcb_module modules/mod_socache_shmcb.so
6.save & close
6.Restart Apache & cwp server
7. Finally visit https://www.ssllabs.com/ssltest/ & provide your server FQDN , And See result , your server SSL certificate is A+ grade.
Source : Cipherli.st Strong Ciphers for Apache, nginx and Lighttpd
https://cipherli.st/
If you need any further assistance , just post a comment below , i will try to assist you.
14
SSL / Secure your Webmail with Letsencrypt SSL Certificate , 100% Working
« on: April 19, 2018, 11:14:47 AM »
Hello Guys,
To secure your webmail with Green SSL bar , just follow the steps below describe
1. Follow the Link http://forum.centos-webpanel.com/ssl/install-letsencrypt-ssl-certificate-for-your-server-hostnamefqdn-100-working/
2. Go to "/usr/local/cwpsrv/conf.d/" and open
#vi webmail.conf
server {
listen 2096;
server_name localhost;
ssl on;
ssl_session_timeout 90m;
ssl_certificate /etc/letsencrypt/live/server1.datahead.biz/fullchain.pem;
ssl_certificate_key /etc/letsencrypt/live/server1.datahead.biz/privkey.pem;
ssl_protocols TLSv1 TLSv1.1 TLSv1.2;
ssl_ciphers HIGH:!aNULL:!MD5;
ssl_prefer_server_ciphers on;
save & exit .
3. Restart your centos webpanel .
4. Now Check https://server1.datahead.biz:2096/
15
SSL / Install Letsencrypt SSL Certificate for your Server Hostname/FQDN, 100% Working
« on: April 18, 2018, 05:40:20 PM »
Hello Guys,
Today I am going to show you a easy steps to install Letsencrypt SSL Certificate for your Server Hostname/FQDN and I hope that it will be 100% working on your CentOS-Webpanel as mine .
Environment Details:
CentOS-Web Panel version: CWP7.admin
IP: Single (103.56.209.100)
RAM: 4 GB
Type: VPS
[root@server1 ~]# hostname
server1.datahead.biz
[root@server1 ~]# cat /etc/redhat-release
CentOS Linux release 7.4.1708 (Core)
[root@server1 ~]# getenforce
Disabled
[root@server1 ~]# systemctl status firewalld
â firewalld.service
Loaded: masked (/dev/null; bad)
Active: inactive (dead)
Must have proper DNS Records/Configuration
My Basic DNS records as follows:
A records with PTR
server1 103.56.209.100
ns1 103.56.209.100
ns2 103.56.209.100
server1.datahead.biz resolves to 103.56.209.100
ns1.datahead.biz resolves to 103.56.209.100
ns2.datahead.biz resolves to 103.56.209.100
After Completing all Basic configuration , Follow the Basic Steps below :
1.Apache Settings >> Letsencrypt Manager >> Install Letsencrypt
2. From Custom Install of Letsencrypt Options , Provide your Basic Information . Example :
Custom Install (can be used for hostname also):
Domain: server1.datahead.biz
Path:/usr/local/apache/htdocs/
UserName: nobody
Email: rubeldonarman@gmail.com [your valid email]
IP: 103.56.209.100
Port: 443
3. Now Click on "Install Custom Certificate"
===================After few Minutes , you will get below information as mine ===============
# vhost_start server1.datahead.biz
<VirtualHost 103.56.209.100:443>
ServerName server1.datahead.biz
ServerAdmin rubeldonarman@gmail.com
DocumentRoot /usr/local/apache/htdocs/
SSLEngine on
SSLCertificateFile /etc/letsencrypt/live/server1.datahead.biz/cert.pem
SSLCertificateKeyFile /etc/letsencrypt/live/server1.datahead.biz/privkey.pem
SSLCertificateChainFile /etc/letsencrypt/live/server1.datahead.biz/fullchain.pem
SetEnvIf User-Agent ".*MSIE.*" nokeepalive ssl-unclean-shutdown
<IfModule mod_suexec.c>
SuexecUserGroup nobody nobody
</IfModule>
<IfModule mod_suphp.c>
suPHP_UserGroup nobody nobody
suPHP_ConfigPath /home/nobody
</IfModule>
<Directory "/usr/local/apache/htdocs/">
AllowOverride All
</Directory>
</VirtualHost>
# vhost_end server1.datahead.biz
========================== Copy the above information ========================
4.Go to Apache Settings >> Apache Include Conf >> hostname-ssl.conf
You will see your server self-sign ssl certificate as below (backup it before proceed):
# vhost_start server1.datahead.biz
<VirtualHost 103.56.209.100:443>
ServerName server1.datahead.biz
DocumentRoot /usr/local/apache/htdocs
SSLEngine on
SSLCertificateFile /etc/pki/tls/certs/server1.datahead.biz.cert
SSLCertificateKeyFile /etc/pki/tls/private/server1.datahead.biz.key
SSLCertificateChainFile /etc/pki/tls/certs/server1.datahead.biz.bundle
SetEnvIf User-Agent ".*MSIE.*" nokeepalive ssl-unclean-shutdown
<IfModule mod_suexec.c>
SuexecUserGroup nobody nobody
</IfModule>
<IfModule mod_suphp.c>
suPHP_UserGroup nobody nobody
</IfModule>
<Directory "/usr/local/apache/htdocs">
AllowOverride All
</Directory>
</VirtualHost>
# vhost_end server1.datahead.biz
5. Delete self-sign ssl configuration and paste here your Letsencrypt Configuration as below :
# vhost_start server1.datahead.biz
<VirtualHost 103.56.209.100:443>
ServerName server1.datahead.biz
ServerAdmin rubeldonarman@gmail.com
DocumentRoot /usr/local/apache/htdocs/
SSLEngine on
SSLCertificateFile /etc/letsencrypt/live/server1.datahead.biz/cert.pem
SSLCertificateKeyFile /etc/letsencrypt/live/server1.datahead.biz/privkey.pem
SSLCertificateChainFile /etc/letsencrypt/live/server1.datahead.biz/fullchain.pem
SetEnvIf User-Agent ".*MSIE.*" nokeepalive ssl-unclean-shutdown
<IfModule mod_suexec.c>
SuexecUserGroup nobody nobody
</IfModule>
<IfModule mod_suphp.c>
suPHP_UserGroup nobody nobody
suPHP_ConfigPath /home/nobody
</IfModule>
<Directory "/usr/local/apache/htdocs/">
AllowOverride All
</Directory>
</VirtualHost>
# vhost_end server1.datahead.biz
6. Click on "Save Changes"
7.Restart your Apache server
[root@server1 ~]# systemctl restart httpd
8. Now Edit and Save
[root@server1 ~]# vi /usr/local/cwpsrv/conf/cwpsrv.conf
server {
listen 2031;
listen 2087;
listen 2083;
server_name localhost;
ssl on;
ssl_session_timeout 90m;
ssl_certificate /etc/letsencrypt/live/server1.datahead.biz/fullchain.pem;
ssl_certificate_key /etc/letsencrypt/live/server1.datahead.biz/privkey.pem;
ssl_protocols TLSv1 TLSv1.1 TLSv1.2;
ssl_ciphers HIGH:!aNULL:!MD5;
ssl_prefer_server_ciphers on;
error_page 497 https://$host:2087$request_uri;
9.Restart the services
[root@server1 ~]# systemctl restart httpd
[root@server1 ~]# systemctl restart cwpsrv
10. Finally Check and visit
CWP Admin Panel Link (by hostname)
https://server1.datahead.biz:2031/
https://server1.datahead.biz:2087/
CWP User Panel Link (by hostname)
https://server1.datahead.biz:2083/
if you need any kind of help , please comment
Pages: [1]